
20 August 2013
4. Level parsing (.lvl files)
It's time to get our hands dirty !
So, how to start a project like this ? What motivated us to create a new version of XMoto is that you can get the 3000+ levels designed for XMoto and then reuse them in the web version of the game.
To make it works, the first thing to do is to look into the bowels of a level, preferably a simple level. So we take the first level (l1038.lvl) and we open it in our favorite text editor: Sublime Text.
 1<?xml version="1.0" encoding="utf-8"?>
 2<level id="aero_training1" levelpack="aeRo's Training" levelpackNum="01">
 3  <info>
 4    <name>aeRo's Training #01</name>
 5    <description>Learn important tricks for xmoto here.</description>
 6    <author>Christian Z</author>
 7    <date>2007-02-11</date>
 8    <sky>sky1</sky>
 9  </info>
10  <limits left="-15.000000" right="15.000000" top="7.000000" bottom="-7.000000"/>
11  <block id="path2362">
12    <position x="-15.075000" y="7.671768"/>
13    <usetexture id="Dirt"/>
14    <vertex x="3.725000" y="-12.818534" edge="GrayBricks"/>
15    <vertex x="4.225000" y="-13.818534" edge="GrayBricks"/>
16    <vertex x="12.225000" y="-13.818534"/>
17    <vertex x="12.225000" y="-12.818534" edge="GrayBricks"/>
18    <vertex x="14.225000" y="-12.818534"/>
19    <vertex x="14.225000" y="-11.818534" edge="GrayBricks"/>
20    <vertex x="16.225000" y="-11.818534"/>
21    <vertex x="16.225000" y="-10.818534" edge="GrayBricks"/>
22    <vertex x="18.225000" y="-10.818534"/>
23    <vertex x="18.225000" y="-13.818534" edge="GrayBricks"/>
24    <vertex x="24.725000" y="-13.818534" edge="GrayBricks"/>
25    <vertex x="25.225000" y="-12.818534" edge="GrayBricks"/>
26    <vertex x="25.725000" y="-12.318534"/>
27    <vertex x="25.725000" y="-11.318534"/>
28    <vertex x="25.225000" y="-10.818534"/>
29    <vertex x="24.225000" y="-9.318534" edge="GrayBricks"/>
30    <vertex x="24.725000" y="-8.318534" edge="GrayBricks"/>
31    <vertex x="26.225000" y="-7.318535" edge="GrayBricks"/>
32    <vertex x="30.125000" y="-6.218535"/>
33    <vertex x="30.125000" y="-15.318534"/>
34    <vertex x="0.025000" y="-15.318534"/>
35    <vertex x="0.025000" y="-7.918534" edge="GrayBricks"/>
36    <vertex x="3.225000" y="-9.318534" edge="GrayBricks"/>
37  </block>
38  <entity id="path2370" typeid="PlayerStart">
39    <size r="0.400000"/>
40    <position x="-9.850000" y="-5.946767"/>
41  </entity>
42  <entity id="path2372" typeid="EndOfLevel">
43    <size r="0.500000"/>
44    <position x="8.079999" y="-5.276767"/>
45  </entity>
46  <entity id="path2212" typeid="Sprite">
47    <size r="0.400000"/>
48    <position x="-6.875000" y="-6.271768"/>
49    <param name="z" value="-1"/>
50    <param name="name" value="ThisWaySignRight1"/>
51  </entity>
52</level>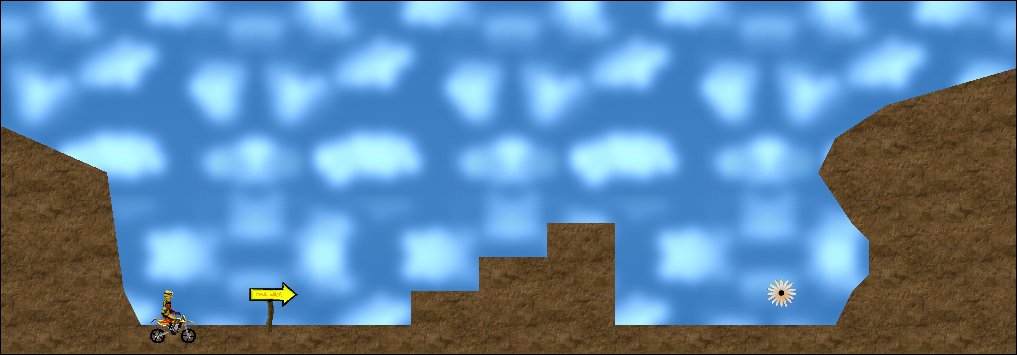
Good news: each level is made of XML. XML is a markup language easy to read (human) and to parse (computer). There are a lot of libraries for this in every language. Because the web himself is made of XML files (HTML and XHTML especially is kind of a XML file), we can use jQuery, the most popular JavaScript library for this specific task.
jQuery defines itself as
A fast, small, and feature-rich JavaScript library. It makes things like HTML document traversal and manipulation, event handling, animation, and Ajax much simpler with an easy-to-use API that works across a multitude of browsers. With a combination of versatility and extensibility, jQuery has changed the way that millions of people write JavaScript.
And, as a web developer, I couldn't agree more !
Structure of a level
When you look at the XML level file, it's not difficult to see what are the most important parts:
- From line 3 to 10, general informations (name, description, etc.)
- From line 11 to 37, "blocks" are defined by many vertices.
- From line 38 to 51, "entities" and you can guess, by the name, the purpose of them (PlayerStart, EndOfLevel, Sprite, ...).
Because you need to start somewhere, the first step of our game development will be to display some level blocks on the screen. For this to be completed, we need to parse the blocks from the XML file.
XML parsing
In our case, we don't want to make HTML manipulations, but XML manipulations. More specifically we want to parse the file. "Parsing" is getting data from the file and store it into the memory of the computer. Next, we will be able to use this data to display it on the user's screen.
Don't worry, jQuery has someting just for us: jQuery.parseXML(data). Their example is the following :
1var xml    = "<rss version='2.0'><channel><title>RSS Title</title></channel></rss>";
2var xmlDoc = $.parseXML( xml );
3var title  = $( xmlDoc ).find( "title" );
On the first line, they write a simple XML string. Then they parse this string to get a nice structure in memory. On the third line, they use the find() method to get the value of the <title> tag on the XML. As you may guess, at the end, the title variable contains 'RSS Title'.
In XMoto, the XML is not stored in a string, but in a file. So we need to do things differently. The solution is to make an AJAX call to our file and then call (line 10) a parsing method when the file is loaded.
The (high level) code is the following :
 1class Level
 2  constructor: ->
 3
 4  # Load a specific level in a XML pack
 5  load_from_file: (file_name) ->
 6    $.ajax({
 7      type:     "GET",
 8      url:      "/xmoto_data/Levels/#{file_name}",
 9      dataType: "xml",
10      success:  @xml_parser
11      async:    false
12    })
13
14  # Parse the level XML
15  xml_parser: (xml) ->
16    @xml_parse_infos(xml)
17    @xml_parse_layer_offsets(xml)
18    @xml_parse_limits(xml)
19    @xml_parse_script(xml)
20    @xml_parse_blocks(xml)
21    @xml_parse_entities(xml)
22
23# Load and file the level
24level = new Level()
25level.load_from_file('l1038.lvl')
The @xml_parse_* methods are method dedicated to parse specific informations of the file. As we want to parse blocks, this is the xml_parse_blocks() method.
 1xml_parse_blocks: (xml) ->
 2
 3  # xml structure
 4  xml_blocks = $(xml).find('block')
 5
 6  # where we are going to store block informations
 7  @blocks = []
 8
 9  # we parse each blocks from the structure
10  for xml_block in xml_blocks
11    block =
12      id: $(xml_block).attr('id')
13      position:
14        x: parseFloat($(xml_block).find('position').attr('x'))
15        y: parseFloat($(xml_block).find('position').attr('y'))
16      usetexture:
17        id: $(xml_block).find('usetexture').attr('id')
18      vertices: []
19
20    # we parse each vertices of the block
21    xml_vertices = $(xml_block).find('vertex')
22    for xml_vertex in xml_vertices
23      vertex =
24        x:    parseFloat($(xml_vertex).attr('x'))
25        y:    parseFloat($(xml_vertex).attr('y'))
26        edge: $(xml_vertex).attr('edge')
27
28      block.vertices.push(vertex)
29    @blocks.push(block)
The purpose of this method is to create an internal structure (hash) with general informations about the blocks of the level : position of blocks, texture of blocks, position of vertices (a block is made of a certain number of vertices), etc.
The same parsing structure is repeated for general informations, entities, etc. And after that, every useful part of information about a level is stored in memory.
Next step would be to display that information on the screen, but first, we need to create our own Assets Manager
More informations
- xmoto_level.coffee (source code)