21 November 2013
6. HTML5 - Canvas 2D
Show me the world !
The last articles were about loading files in memory:
The useful informations to display one level: blocks and sprite positions, name of textures, starting position of moto, ending position of level, etc. (cf. Level Parsing)
The assets : images for sprites and textures for blocks (cf. Assets Management)
Now, we're ready to display the level in a HTML5 canvas.
Canvas
Canvas is a HTML5 technology that you can use to make games, animations, videos and other funny stuff for the web. Before HTML5, those things required a plugin for your browser and the most popular of them was Adobe Flash. The big problem with these plugins was that they needed full access to your computer and were subject to many critical issues and sometimes caused the browsers to crash frequently.
Now it's 2013 and the web evolved so much that every browser has internal capabilities to execute animations and games on its own. What it means is that you don't need a plugin anymore to make a game works in the browser. It's now part of the W3C (World Wide Web Consortium) that defines the web standards.
The solution was called : <canvas></canvas>.
There are 2 different kinds of Canvas, 2D canvas and 3D canvas :
2D canvas specifications (2D Context) are created by W3C and provide a list of operations that you can use in your canvas :
fillRect(),drawImage(),createPattern(), etc. A more complete list is here.3D canvas specifications (WebGL) are created by the Khronos Group and bring the power of OpenGL to your browser and supports your GPU for great performances.
We could have used both the specifications but, since XMoto is full-2D, working with canvas 2D is much more easier than working with WebGL.
First XMoto level
To test the display of the levels, we are going to target one specific level : l1038.lvl (source). This is the level we parsed in Chapter 4.
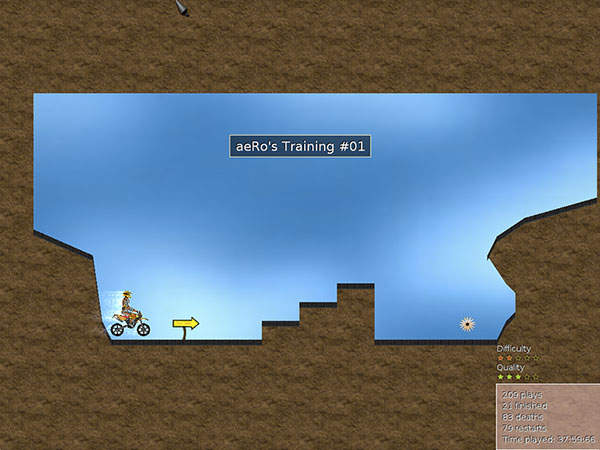
This is the first level that is presented to the user when the original game in launched and it looks like this:

As you can see from the image and the source of the level, this is a very simple level (53 lines in the xml file). There are just some general informations, one single block and some classic entities like PlayerStart, EndOfLevel and Sprite. The perfect level to start drawing.
In this chapter, we will only learn how to draw blocks (ground, walls, etc.) and sprite entities because they illustrate two different types of drawings (createPattern() and drawImage()) and the rest of the level (sky, edges, etc.) can also be created with these two methods. So the code will almost be the same.
First thing to do is to create the canvas context:
canvas = $('#game').get(0)
ctx    = canvas.getContext('2d')
where the HTML canvas looks like this:
<canvas id="game"></canvas>
The context variable is then used to execute any method related to Canvas 2D.
Blocks
 1display: (ctx) ->
 2  for block in @blocks
 3    ctx.beginPath()
 4
 5    for vertex, i in block.vertices
 6      if i == 0
 7        ctx.moveTo(vertex.absolute_x, vertex.absolute_y)
 8      else
 9        ctx.lineTo(vertex.absolute_x, vertex.absolute_y)
10
11    ctx.closePath()
12
13    ctx.save()
14    ctx.scale(1.0 / 40.0, -1.0 / 40.0)
15    ctx.fillStyle = ctx.createPattern(@assets.get(block.usetexture.id), 'repeat')
16    ctx.fill()
17    ctx.restore()
Explanations:
Line 2: We loop on the blocks that we have in memory (parsed at the start of the level).
Line 3: We start the drawing of a "path" with
ctx.beginPath(). A path is a serie of vertices that creates a polygon.Lines 5-9: For each block, we loop on its vertices (a block has many vertices). The first point (
ctx.moveTo()) or the next point (ctx.lineTo()) of the path is created.Line 11: The path is finished and the polygon is closed with
ctx.closePath()Lines 13-17:
ctx.save(): the current context (translation, scale, etc.) is saved.ctx.scale(): Zoom or dezoom of the texture (from the current context).ctx.fillStyle: Defines how the path will be filled. Can be a colour, a gradient or a pattern.ctx.createPattern(): Create a pattern (an image that is repeated).@assets.get()get the image from our assets manager using its name (block.usetexture.id).ctx.restore(): The current context is restored.
Entities / Sprites
 1display_sprites: (ctx) ->
 2  for entity in @list
 3    if entity.type_id == 'Sprite'
 4      texture_name = @entity_texture_name(entity)
 5
 6      ctx.save()
 7
 8      ctx.translate(entity.position.x, entity.position.y)
 9      ctx.scale(1, -1)
10      ctx.drawImage(@assets.get(texture_name),
11                    -entity.size.width  + entity.center.x,
12                    -entity.size.height + entity.center.y,
13                    entity.size.width,
14                    entity.size.height)
15
16      ctx.restore()
17
18entity_texture_name: (entity) ->
19  for param in entity.params
20    if param.name == 'name'
21      return param.value
Explanations:
Line 2: We loop on the entities that we have in memory (parsed at the start of the level).
Line 3: Test if the entity if of type "Sprite" (some entities don't need to be displayed).
Line 4: We get the sprite's name. In the XML file, the name of the sprite is stored as parameter named "name".
Lines 6-16:
ctx.save(): the current context (translation, scale, etc.) is saved.ctx.scale(): Reverse the Y axis before drawing the image.ctx.drawImage(): Draw the image on the screen and center it. The parameters 2 and 3 define the starting position of the image. The parameters 4 and 5 define the size of the image.ctx.restore(): The current context is restored.
Results
After the sky is created (another createPattern()) and some global scale adjustments, you finally got this wonderful display.

Just a flat, static screen of a XMoto level, with no moto in it and no interactions.
But there's more to come in the next chapters. Starting with the integration of Box2D for the physics !
More informations
- Complete source code of this version
- Documentation of
ctx.createPattern() - Documentation of
ctx.drawImage()
